Would you tile a hearth???
You would if your raised hearth had already been painted PEACH, and then you tried to fix it by painting it black, only to turn it into even more of an eyesore!
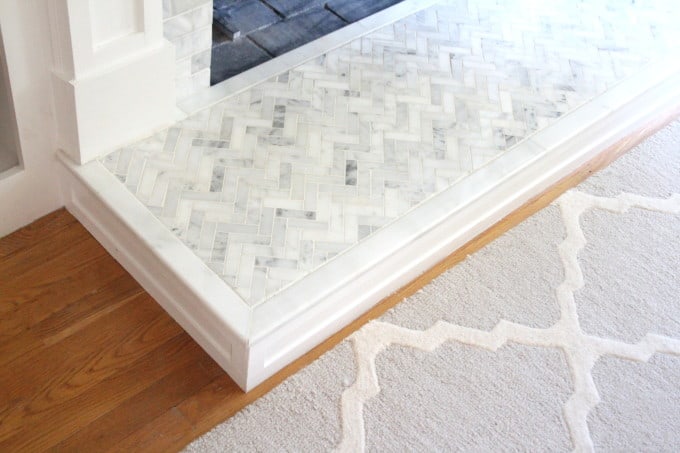
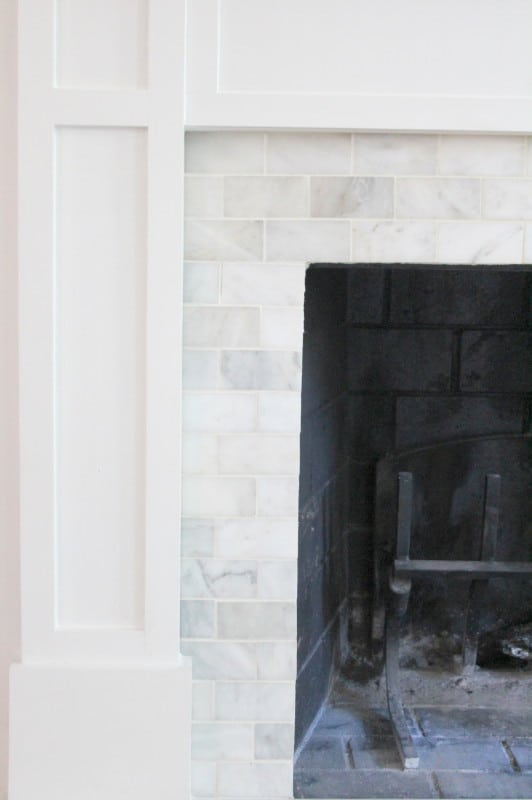
Today I’m back with the why and how our fireplace went from this…….

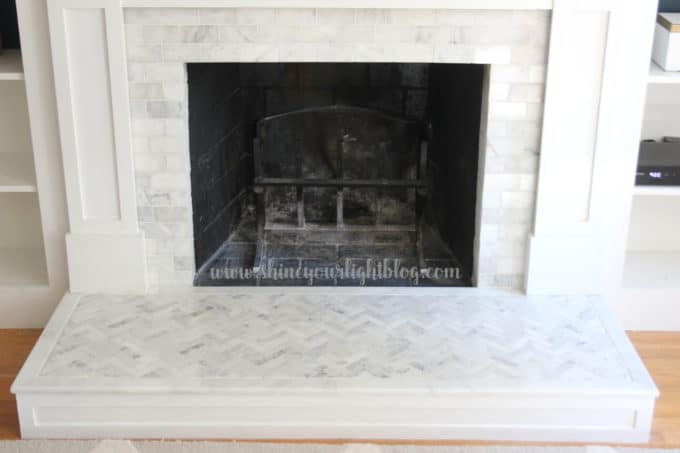
to this!

It’s an improvement, right? 🙂
This post contains affiliate links for your convenience. Read my full disclosure policy here.
THE WHY
Before I get into how I installed the tiled hearth, I want to address some questions for those of you who are contemplating this project. You can scroll down a bit to get right to the installation.
WHAT’S WRONG WITH THE BRICK?
You may recall our fireplace was already painted (peach!) when we bought this house, which I swiftly painted white – it was a huge improvement that completely brightened up our family room! However, we soon learned that a painted hearth is not such a fabulous idea when you use your wood-burning fireplace 2-4 days a week, 6 months out of the year……the surface looked banged up ALL the time. Eventually I tried black paint but against all the white, it made the hearth even more of an eyesore. We figured that someday we would resurface the hearth with a slab of something hardwearing, like Vermont slate or soapstone. If you have a brick surround you like, don’t start giving it the stink eye – a lot of brick surrounds and hearths are lovely! BUT – if you dislike your brick, tiling over it is a great option.
HOW DID I END UP WITH A MARBLE TILED HEARTH?
Since the mantle was awkwardly high, and we wanted to mount the TV over the fireplace, we always planned on remodeling the fireplace and built-ins. Right before Thanksgiving we tore it apart on a whim because we’re insane like that :). I got some quotes on having a slab cut and installed on top of the existing brick, but after I decided on marble tiles for the surround, I started rethinking the plan for a big dark raised hearth.
I studied pictures of fireplaces that I’d pinned over the years, and noticed that while flat hearths (level with the floor) can look beautiful in either the same color as the surround, or a contrasting color like a slate or black granite, for raised hearths I preferred the look of hearths that are the same material or color as the hardscape on the surround.
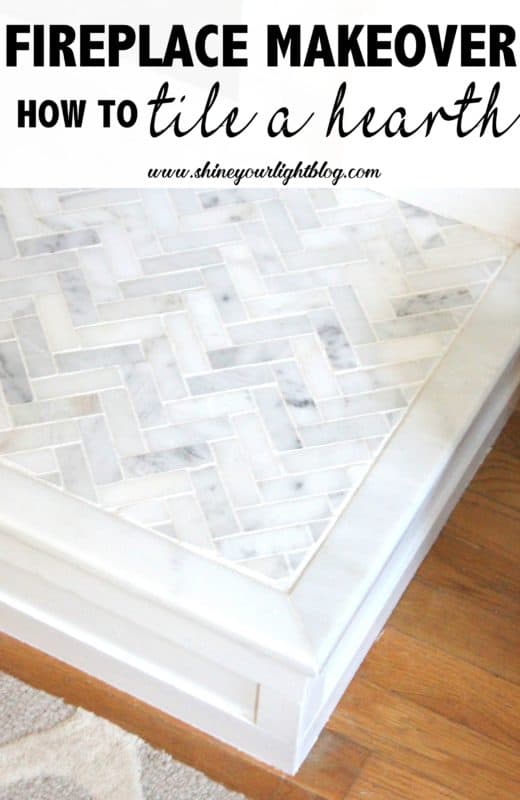
Once I decided I wanted to go with a light colored hearth, I considered getting a marble slab remnant cut – it would have been around the same price as the soapstone – but then I saw pictures of using marble in different patterns for the surround and hearth, and I loved that idea! 1 – for more texture, and 2 – because the herringbone pattern is just so pretty.
HOW DOES THE TILED HEARTH HOLD UP TO FIREPLACE USE?
You might ask – what about the white marble and all that grout – does it get dirty? Since installing this marble tile hearth in December we have typically had 2-4 fires a week. The herringbone pattern and the varied colors of the marble have actually be fantastic as disguising the mess that comes with a wood-burning fireplace, as opposed to the white painted brick. We use the little brush on our tool set to sweep everything into the fireplace while we tend to the fire, and so far the grout looks as white as the day I installed it. I imagine over the years it might get dirty and then I’ll probably use grout paint to touch it up if need be. Overall I am very pleased with the functionality of the tiled hearth!
Marble does need to be sealed, especially if it’s being used around a wood-burning fireplace that emits smoke and heat, or over a cooktop, otherwise it can stain really badly. I wrote about how to seal marble here.
Phew! That was a lot of chit chat. Let’s get to the good part – how to actually tile a hearth!
THE HOW

CHOOSING THE MATERIAL
As I mentioned in last week’s post about tiling the surround, I used these Venatino 2″x4″ marble tiles, choosing sheets that gravitated more towards creamy white with grey and beige. Venatino is considered a Carrara marble that is more white than grey but a lot of the sheets of tile were predominantly grey.
The herringbone tile is just called “white marble” and it does differ from the Venatino tiles somewhat – many of the sheets of herringbone had a lot of darker grey tiles. Since I was trying to make the surround and hearth cohesive, I looked for sheets that leaned more toward creamy white with bits of grey and beige, but for the sake of disguising soot and wood debris I intentionally used a bit more grey on the hearth. The beauty of using tile is that you can mix up the colors to create an overall composition that you love.
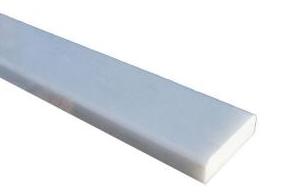
Once I decided on the marble, I thought long and hard about a border. I wanted the top of the hearth to have some substance like a slab of marble would have. When I came across these 2″ wide natural marble threshold pieces I knew they would be perfect as a border for the herringbone. Keep in mind however that cultured marble thresholds are flammable because the of the resin used to manufacture them, so they are not a good choice for a fireplace project!

BOXING OUT THE HEARTH WITH WOOD
I covered up the existing brick on the sides and front of the hearth with moulding that mimics the trim on the surround and upper mantle. To do this I used Liquid Nails to build out the hearth a bit with scrap wood, and then attached birch (paint-grade) plywood over the scrap wood with both Liquid Nails and a brad nailer. Like the surround, I created a box by attaching lattice trim over the plywood, again with Liquid Nails and brads.
Building it out – 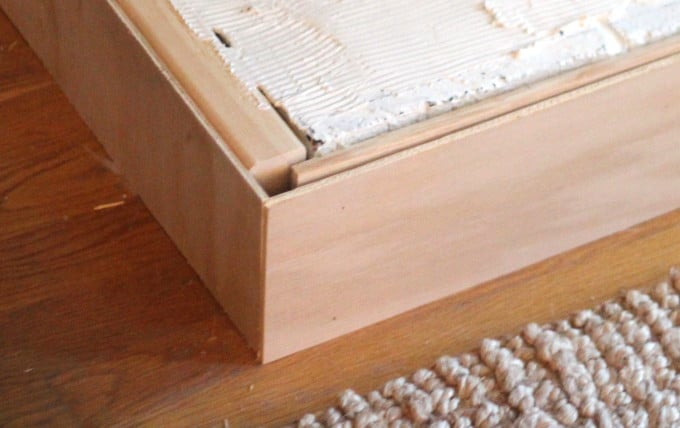
Adding lattice trim to the hearth sides and front –
Hearth sides and front after caulk and paint –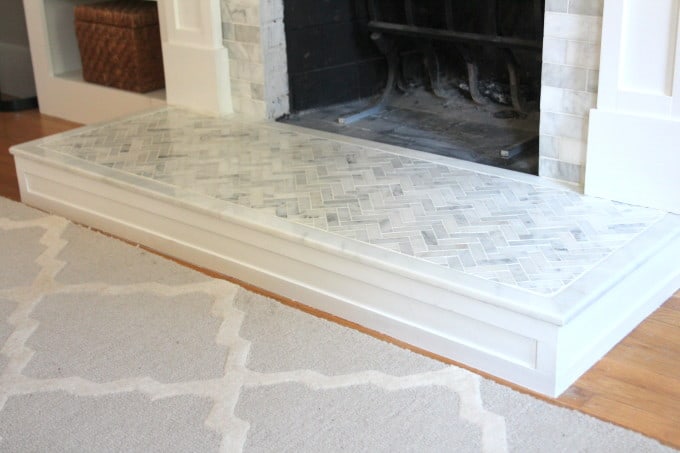
TILING THE TOP OF THE HEARTH
First of all I must mention that tiling directly on top of brick is an option if your brick is mostly flat without deep mortar lines, like mine. If your brick is very uneven, has a lot of texture, or has deep mortar lines between the bricks, you should create an even surface on which to apply the tile by troweling a layer of thinset over the existing material. Read how to do that here. I talked to a tile expert before tiling my fireplace, and he agreed I could go right over the tile on the surround and hearth with adhesive because it was flat enough.
Also, before you start, check your hearth for level. I discovered that my hearth was a bit higher on one end, so I skim coated the left side to make it level.
I rented a tile wet saw to install both the surround and the hearth. Mark showed me how to use it and then I exercised extreme caution because I’m a scaredy cat and want to keep all my fingers on my hands. If you haven’t used a wet saw before, it is totally do-able!! Have someone show you how to do it, be super aware of where your hands are, wear eye protection, if I can do it you can do it!!!!
Before I could install the pretty herringbone, the marble border had to be installed. The only issue with using the marble threshold as a border is that it is 1/4″ higher than the tile. If I wasn’t using the threshold pieces, I would have put tile adhesive right on top of the tile and set the herringbones into it, but because I was using the threshold as a border, I needed to compensate for the height difference by adding a 1/4″ cement backer board on top of the hearth where the herringbone would be laid. This material is easily cut to size by scoring with a utility knife (the hardest part of using cement board is getting it on your cart in the store, getting it home, and taking it out of the car!!! #imaspaz)
Scoring the cement board with a scrap piece of wood as a guide – 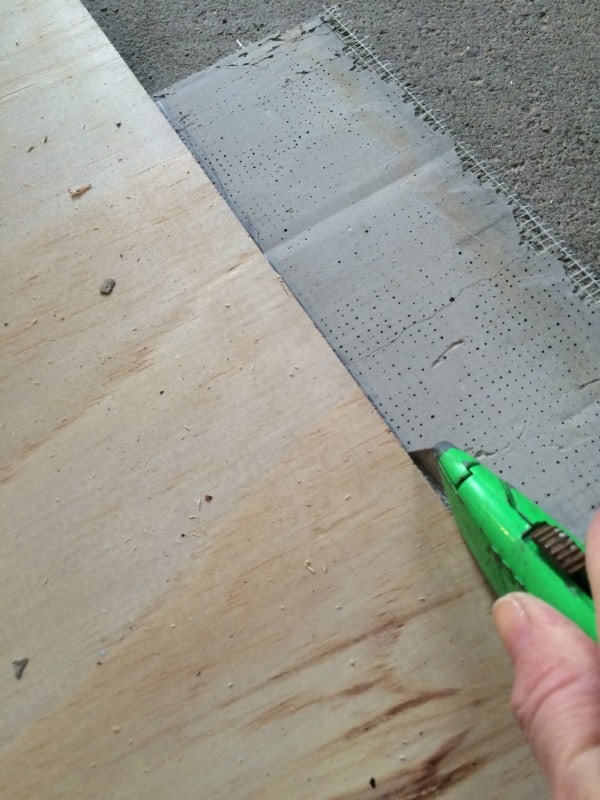
Once the board is scored, snap it on the cut line, then turn over and cut through the paper on the other side. 
After the cement board was cut, I attached it to the brick with Liquid Nails, leaving a space for the threshold around it.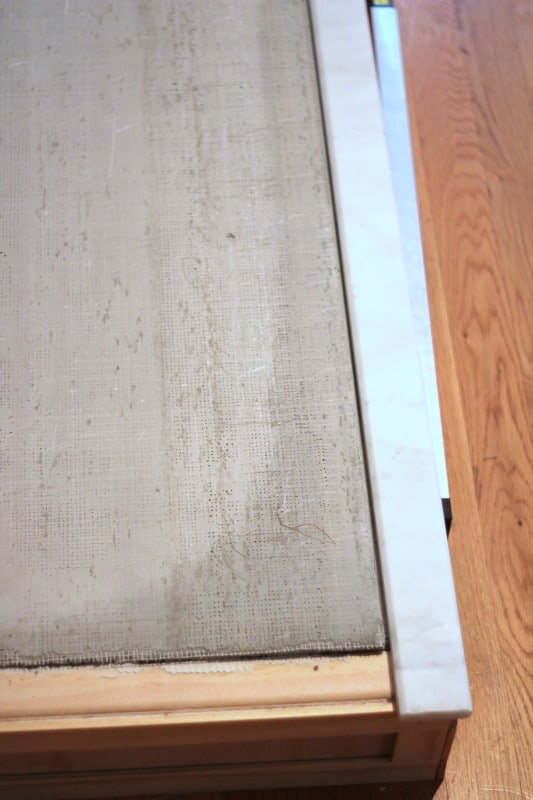
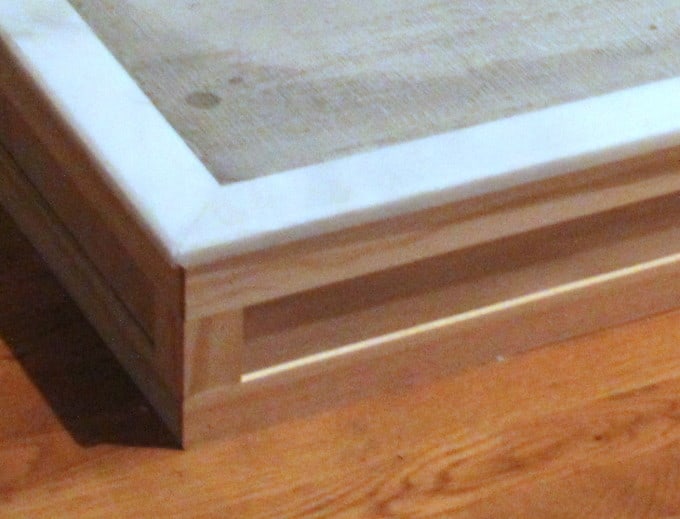
Next up, laying out the design (in the final design I settled on having the threshold border go all the way around the 4 sides of the hearth top). Once everything was dry fitted, I marked the threshold pieces to be miter cut in the front corners. 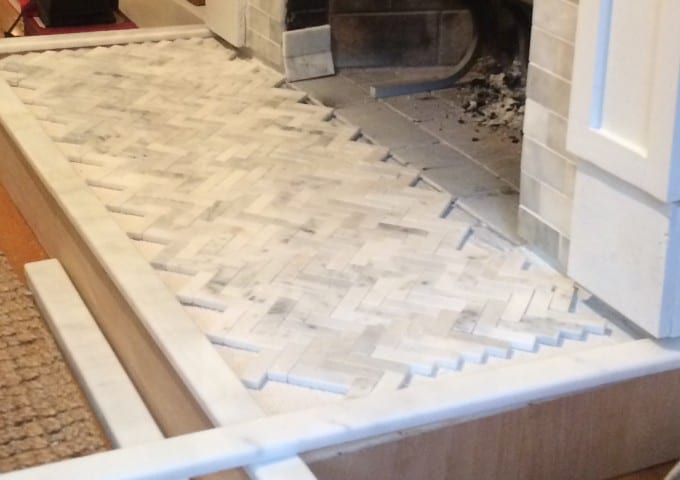
After cutting the threshold pieces on the wet saw, I installed them around the cement board with tile adhesive, creating a border. My plan was to cut 2 pieces for the front, two for the back, and one on each side. However I messed up the first few tries of miter cuts, and so I ended up piecing together the back using 4 remnants.
The front and sides look great and 4 seams in the back are barely noticeable once grouted and with our fireplace screen on ——> so the moral of the story for you is to try to make the front and sides as perfect as you can but don’t worry as much about the back. 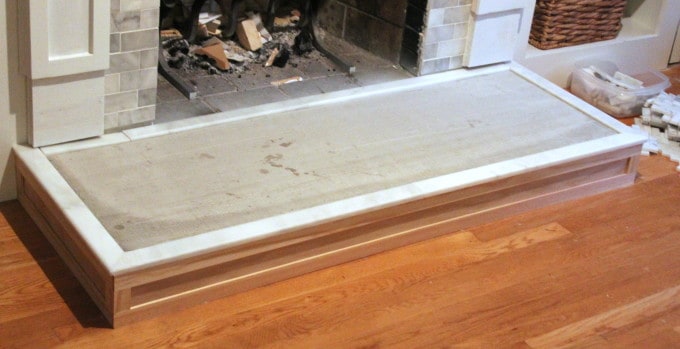
Once I had the border installed, I once again placed the herringbone tiles and marked them for cuts with a pencil. Sarah at Thrifty Decor Chick has a great tutorial on how to cut this exact herringbone tile with a wet saw that you should definitely check out. If you are using marble you should know that it is prone to chipping when you are cutting it. Overall I didn’t have an excessive problem with that.
I used as many full sheets as I could fit, and then filled in the rest of the space by cutting sheets on the wet saw. The little triangular end pieces were cut from the side of a whole sheet, making it pretty easy to cut a bunch at one time.
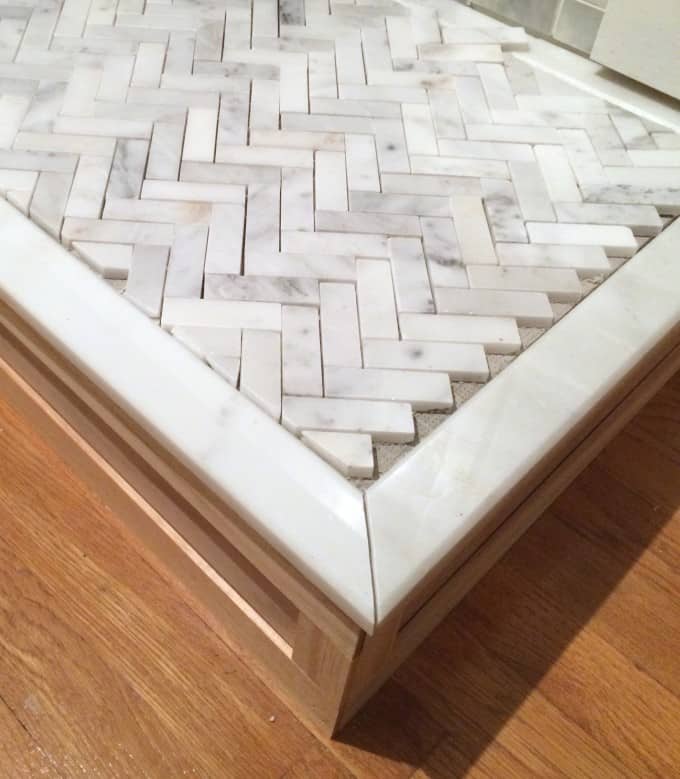
After installing all the tile, I let it set in the adhesive for a few days, and then grouted it with white non-sanded grout.
Because the threshold pieces are beveled on both sides, I ended up with a wider grout line where the herringbone meets the border, but I actually really love the tiny detail of the bevel on the outer edge and the grout line doesn’t bother me.
After the tiling was complete, I boxed out the base of the wood surround with wood that sits flush with the hearth (those square pieces of wood at the bottom of the columns that flank the surround tile.)

All this delicious marble tiling needed to be sealed asap so we could use our fireplace without staining it with smoke. You can read here about my failed marble sealing attempt which required a lot of elbow grease to fix, as well as the right way to do it!
HEARTH SOURCES
Marble Threshold Border
Premixed Tile Adhesive
Premixed Unsanded White Grout
Paint color – Benjamin Moore White Dove
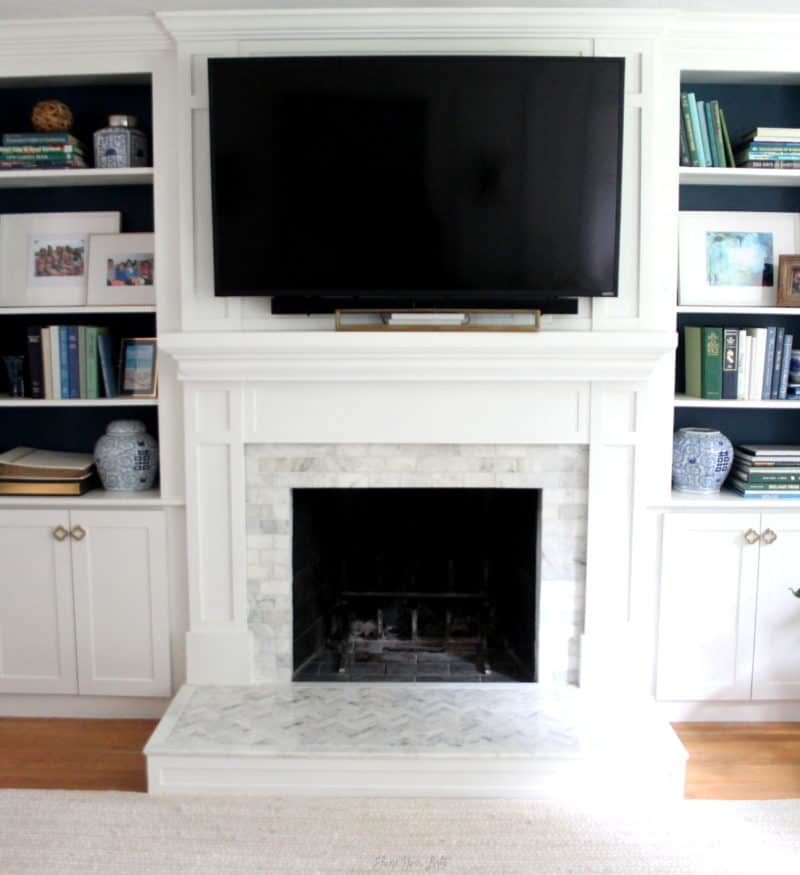
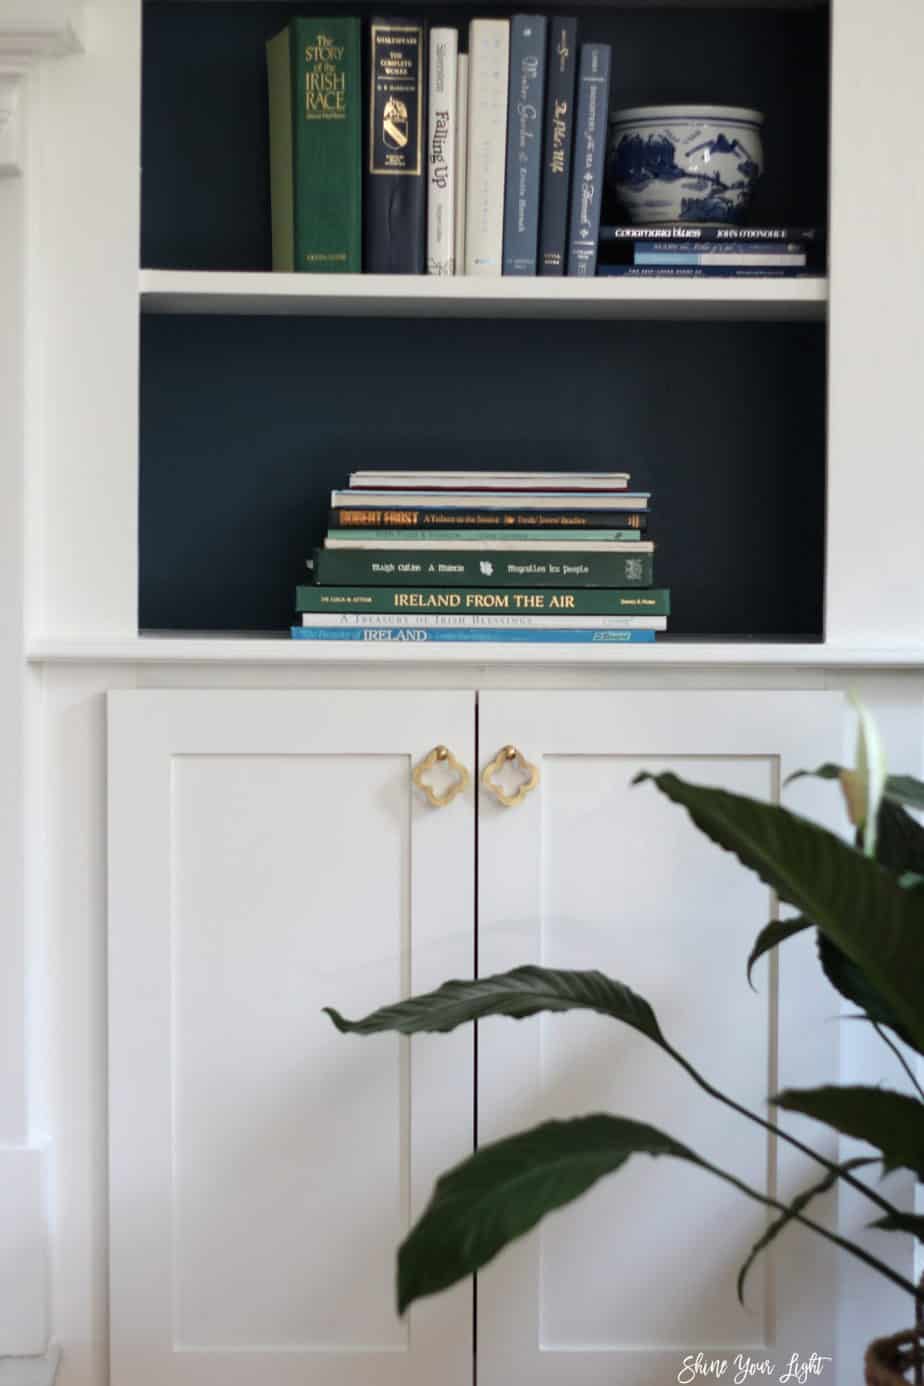
This is how the entire remodel of the fireplace and bookcases came out when all the projects were complete!
If you want to catch up with the fireplace makeover, check out these posts:

Let me know if you have any questions about this crazy fireplace makeover of ours!! It’s one of my favorite renovations thus far and I am happy to help you if I can!

Denise says
It is stunning! Great tutorial Lisa!
Lisa says
Denise thank you for always cheering me on! You’re the best!
cassie @ primitive & proper says
it’s so beautiful! i love the herringbone pattern.
Lisa says
Thank you Cassie!! I had to talk Mark into the herringbone and now he loves it too 🙂
cindy hattersley says
Lisa
You have done a perfect job. Love the fireplace surround, just the right width…perfect!!
Lisa says
That is a very kind adjective Cindy! Thank you so much!
Londen says
So impressed by this project Lisa! It turned out so pretty!
Lisa says
You are so sweet – thank you my friend!
Laura @ The Tiny House Farm says
Lisa the pattern on the base looks incredible. Did you have to cut all those tiles yourself? Just beautiful!
Lisa says
Hi Laura! Thank you so much!! The herringbone tiles come on mesh sheets which made cutting them sooooo much easier than if they were loose. I can’t even imagine cutting and placing each and every one of those tiles individually – I definitely would have gone out of my mind! 🙂
Kris {Driven by Decor} says
I’m in awe my friend – there’s no way anyone wouldn’t think that you paid big bucks for the beautiful hearth – love it so much!
Lisa says
Thank you! I love it too, this reno has totally changed the feel of our family room and really our whole first floor. After all our daydreaming, we are both on the other side of our fireplace makeovers! Yahoo!
Cristina says
Just Gorgeous! I love the herringbone pattern and how you brought the same wooden trim design from the fireplace surround. Such a beautiful and classic style!
Lisa says
Thank you so much Cristina!! So glad I finally tackled that projects….I’ve been thinking about it since the day we moved into our house!
Lianna@theresnoplacelikehomemke says
it looks amazing! what a fantastic transition. It’s also nice to know that sometimes there are small fixes to do before you can afford (and have time for) the more detailed overhaul! Great job!
Lisa says
Thank you Lianna! I dreamed of redoing our fireplace for so long and am so happy I finally took the plunge!
Jessica says
It turned out so beautiful!!! It’s genius how you built out the hearth with wood! Stunning transformation.
Lisa says
Thank you Jessica! We are enjoying that room so much more now that I tackled that big elephant in the room!
Julie says
Hi Lisa! Your firepace is STUNNING. I actually liked the painted brick, but NOW! WHOA!!! You rocked it girl! Sharing on my FB page tonight. I used 2 photos to get them thinking. Hope that’s okay XO ~ Julie redheadcandecorate.com
Lisa says
Julie THANK YOU! That is such a kind comment and I SO appreciate you sharing this on FB! You made my night 🙂
Corinne says
It looks awesome! Now after having it, do you notice if the hearth holds up to wood and wear and tear? Does it scratch? I’m considering using the same kind of tile for my fireplace, thanks!
Lisa says
Corinne, we have tons of fires from October through March, and I actually couldn’t believe how well it held up last year, especially the grout, which I thought might get really dirty. I did seal it and plan to do so again soon before this winter. The grout on the tile above the fireplace box on the surround did discolor a bit and I used grout paint to touch it up but it wasn’t bad – I’m just a little obsessed with my baby 🙂 This is the marble sealing tutorial if you’re interested! https://www.shineyourlightblog.com/2016/05/fireplace-makeover-sealing-marble.html
Corinne says
That’s great news! I’m really excite to use this for my home now! Thank you,
Scott Furlough says
Lisa,
Having 2-3 fires a week… have you noticed any side effects from using the Acrylpro tile adhesive v. thinset ?
• How well has the Acrylpro tile adhesive held up to the heat?
• Has it softened from the heat, causing tiles to shift / fall off?
• Have you noticed any fumes/odors coming from the Acrylpro?
Lisa says
Hi Scott, no – we haven’t had any issues since installing tile to the surround and hearth a year ago. Definitely no shifting or tiles falling off, and no fumes or odors. Neither the surround nor the hearth get hot at all when we have a fire.
Pete says
What tile did you use on the sides of the fireplace
Lisa says
Hi Pete, all the details for tiling the surround, including the exact marble I used, can be found in this post: https://www.shineyourlightblog.com/2016/03/fireplace-makeover-tiling-surround.html
Thanks for stopping by!