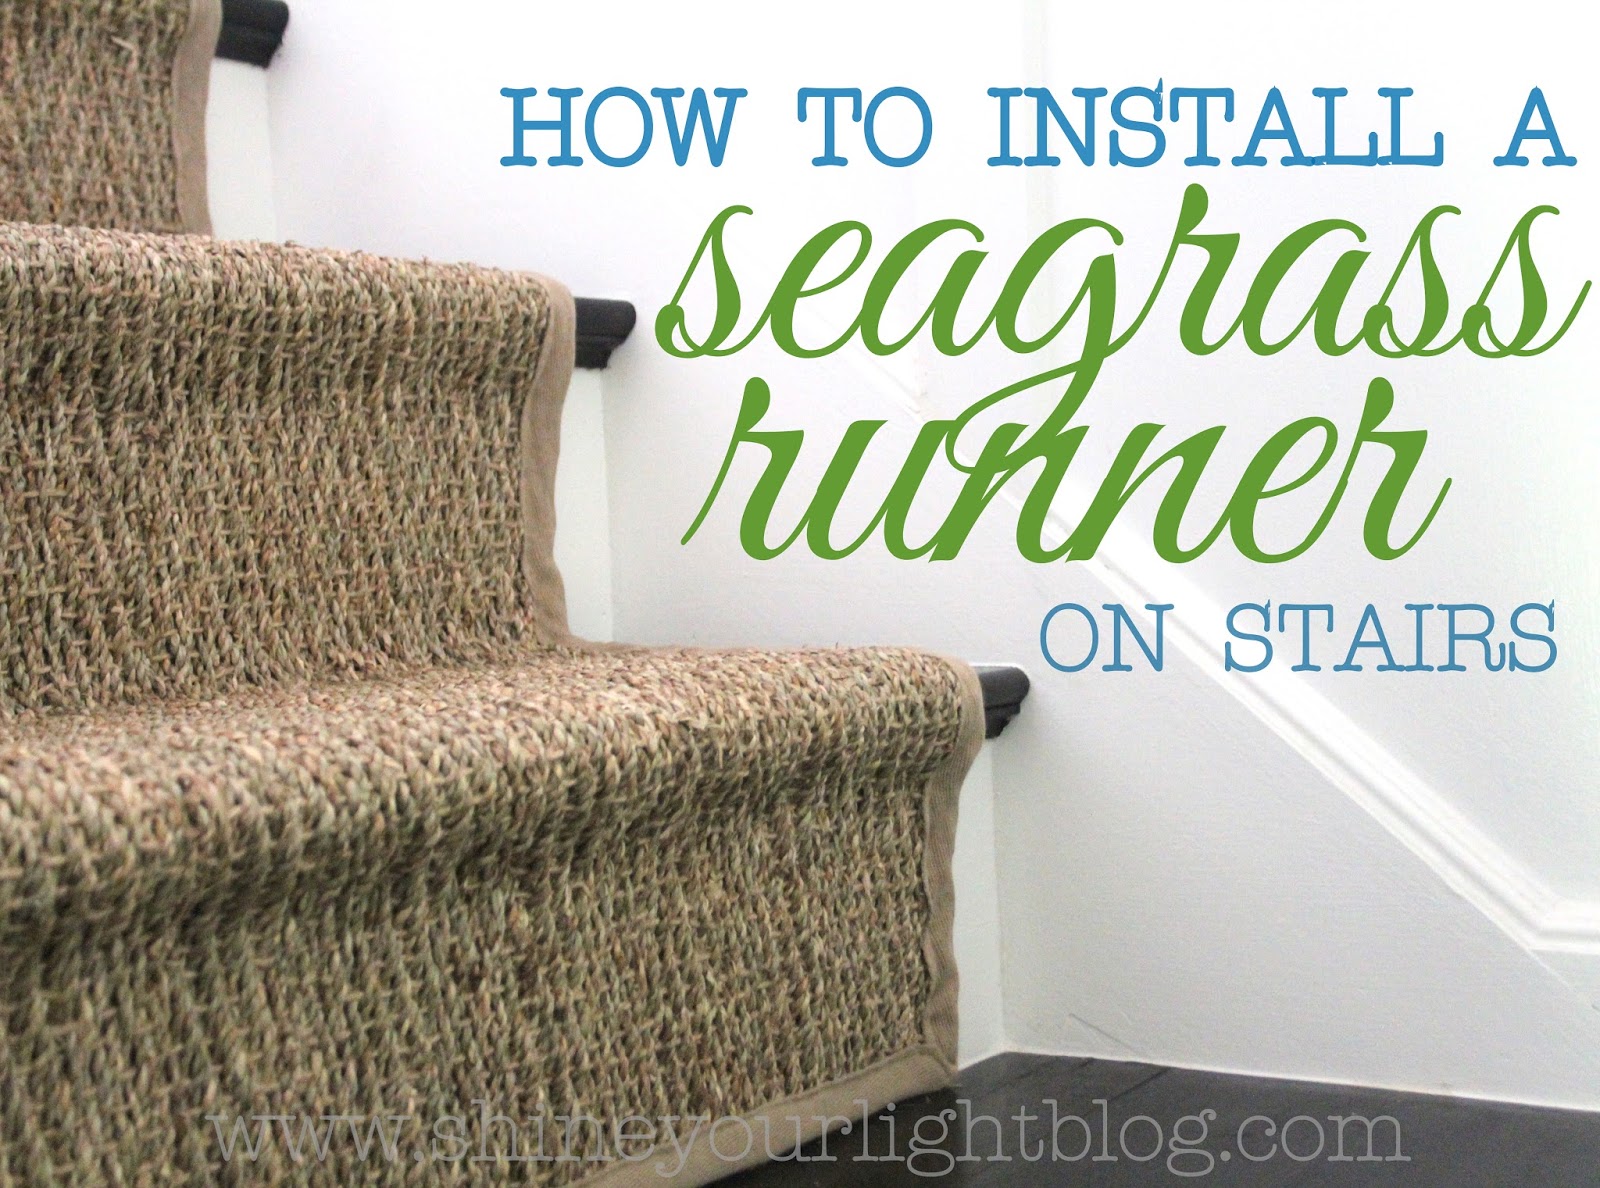
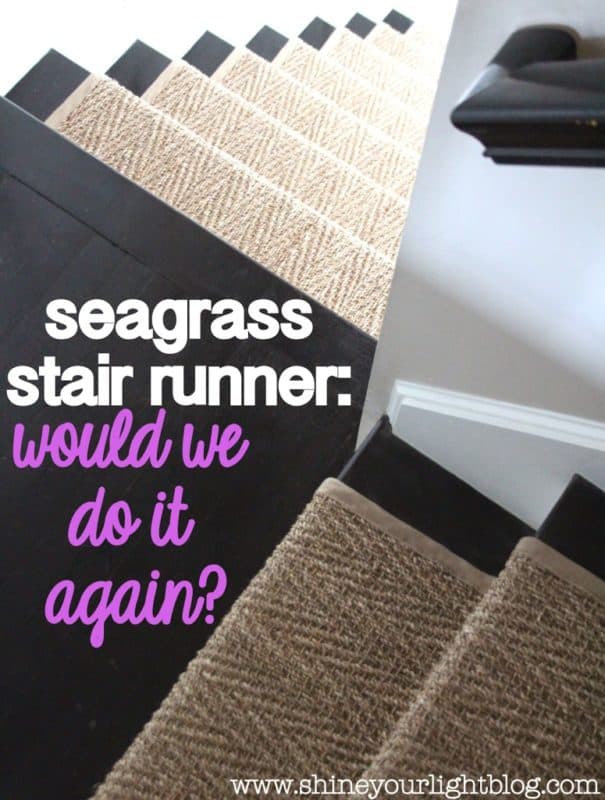
A seagrass stair runner was part of my vision from the moment we saw this house in all it’s orange oak and shades-of-peach glory.
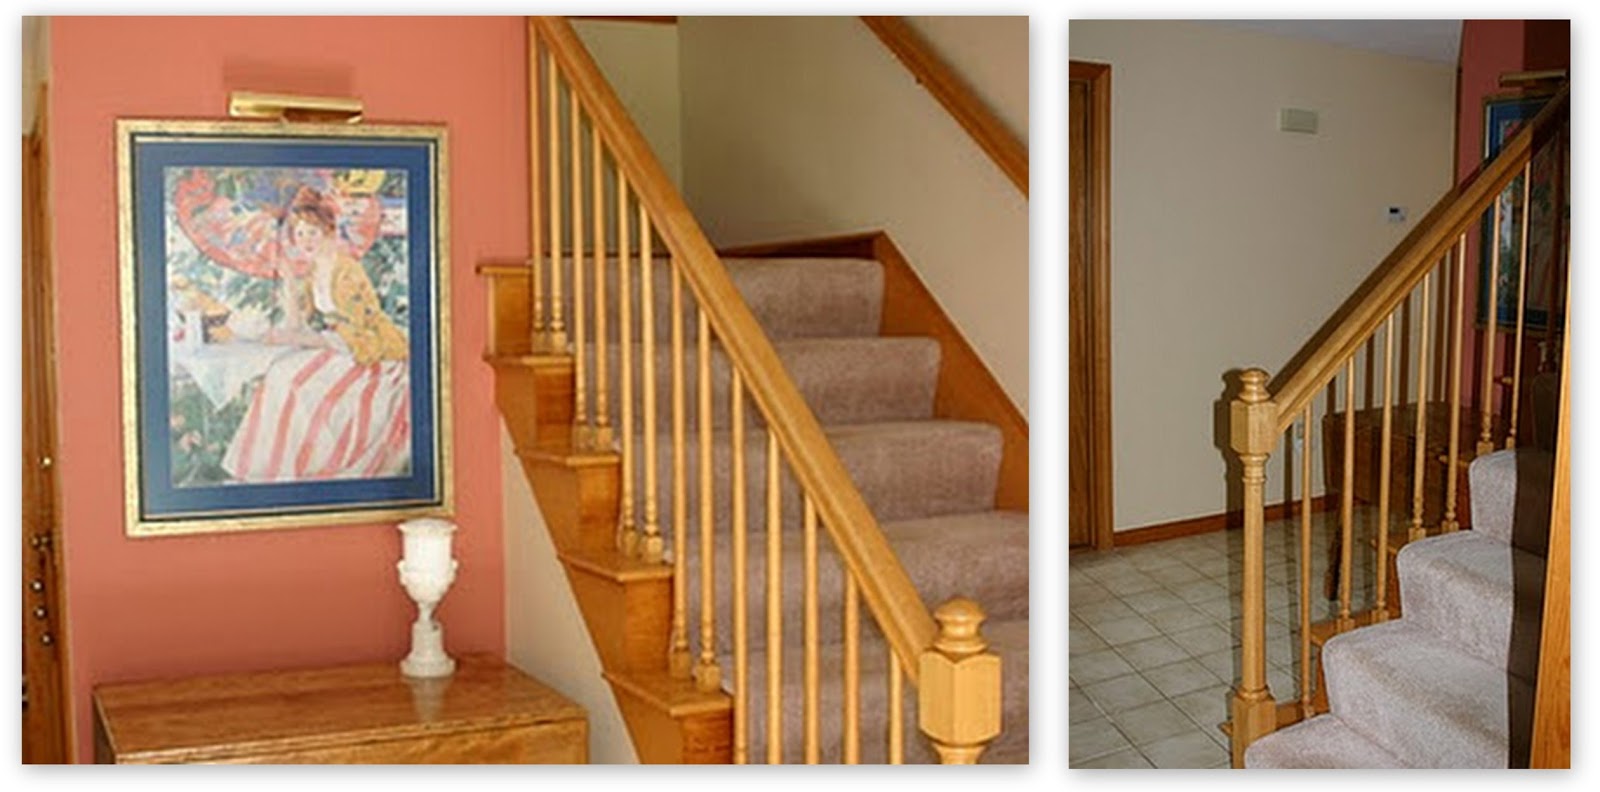
The angels sang the day I tore out the vile, pet-stained runner that came with the house. With a little elbow grease {and a lot of paint :)}……..

…..the foyer joined the new millenium.

Two big things I really wanted to conquer this year: ripping out the 80s tile floor in this foyer, and installing a seagrass runner on the stairs.
Well, the tile isn’t going anywhere until our kitchen gets remodeled (since the kitchen will need knew flooring too, and why suffer twice?), but at long last, the seagrass runner is checked off the list.
I was a bit worried that the seagrass’ thickness would make it difficult to work with, but really the hardest part was cutting the runner perfectly straight. Working with a natural fiber such as seagrass, sisal or jute does pose some minor issues, so in case there is anyone out there who would like to use this material for a stair runner, here is a tutorial. This is truly a pretty easy project that I did myself.
HOW TO INSTALL A SEAGRASS RUNNER ON STAIRS

• runner: for the runner, measure your stairs (treads and risers) and purchase a runner that is a little longer than necessary. I have 11 treads and 13 risers and bought a 20’ runner. I ended up with about 2 feet leftover after making two cuts, but I’m glad I had some excess in case I made a mistake somewhere.
• fastener: I used a pneumatic stapler hooked up to my compressor, and 3/4″ crown staples. You could also use an electric stapler. I don’t recommend a hand-held manual staple gun (like this one that I use for upholstery projects) because you will be putting in a LOT of staples. Holy hand cramp.
• non-slip pad (I used 2 10′ lengths)
• heavy duty scissors or utility knife


UNROLL RUNNER
Unroll runner and secure at the top of the stairs (preferaby have another person hold the runner at the top.) I recommend unrolling the runner before measuring out guidelines (#4). Stairs with spindles can play tricks on your eyes and you should visually see where the runner should fall, rather than just measure and staple. I learned this the hard way!


MEASURE & TAPE GUIDELINES
Measure and use painters tape as a guide on one side of the staircase (treads and risers). Use the tape to line up the runner as you work so it stays evenly spaced in the middle of the stairs. It’s very easy to let it get crooked without a guide (ask me how I know.)
When I first started I was actually off center by an inch or two and had to rip out the whole step and start again (and if you have to do this, seagrass is very forgiving. I just literally yanked it off, banged the staples into the riser, and started over – any pulled fibers on the runner were not visible!


START STAPLING
Line up edge of runner with the bottom riser – make sure you are centered or you’ll have to rip it out like me! – and start stapling, starting with the bottom riser’s corner and continuing as close to the binding as possible. I stapled every half inch or so to make it really secure.

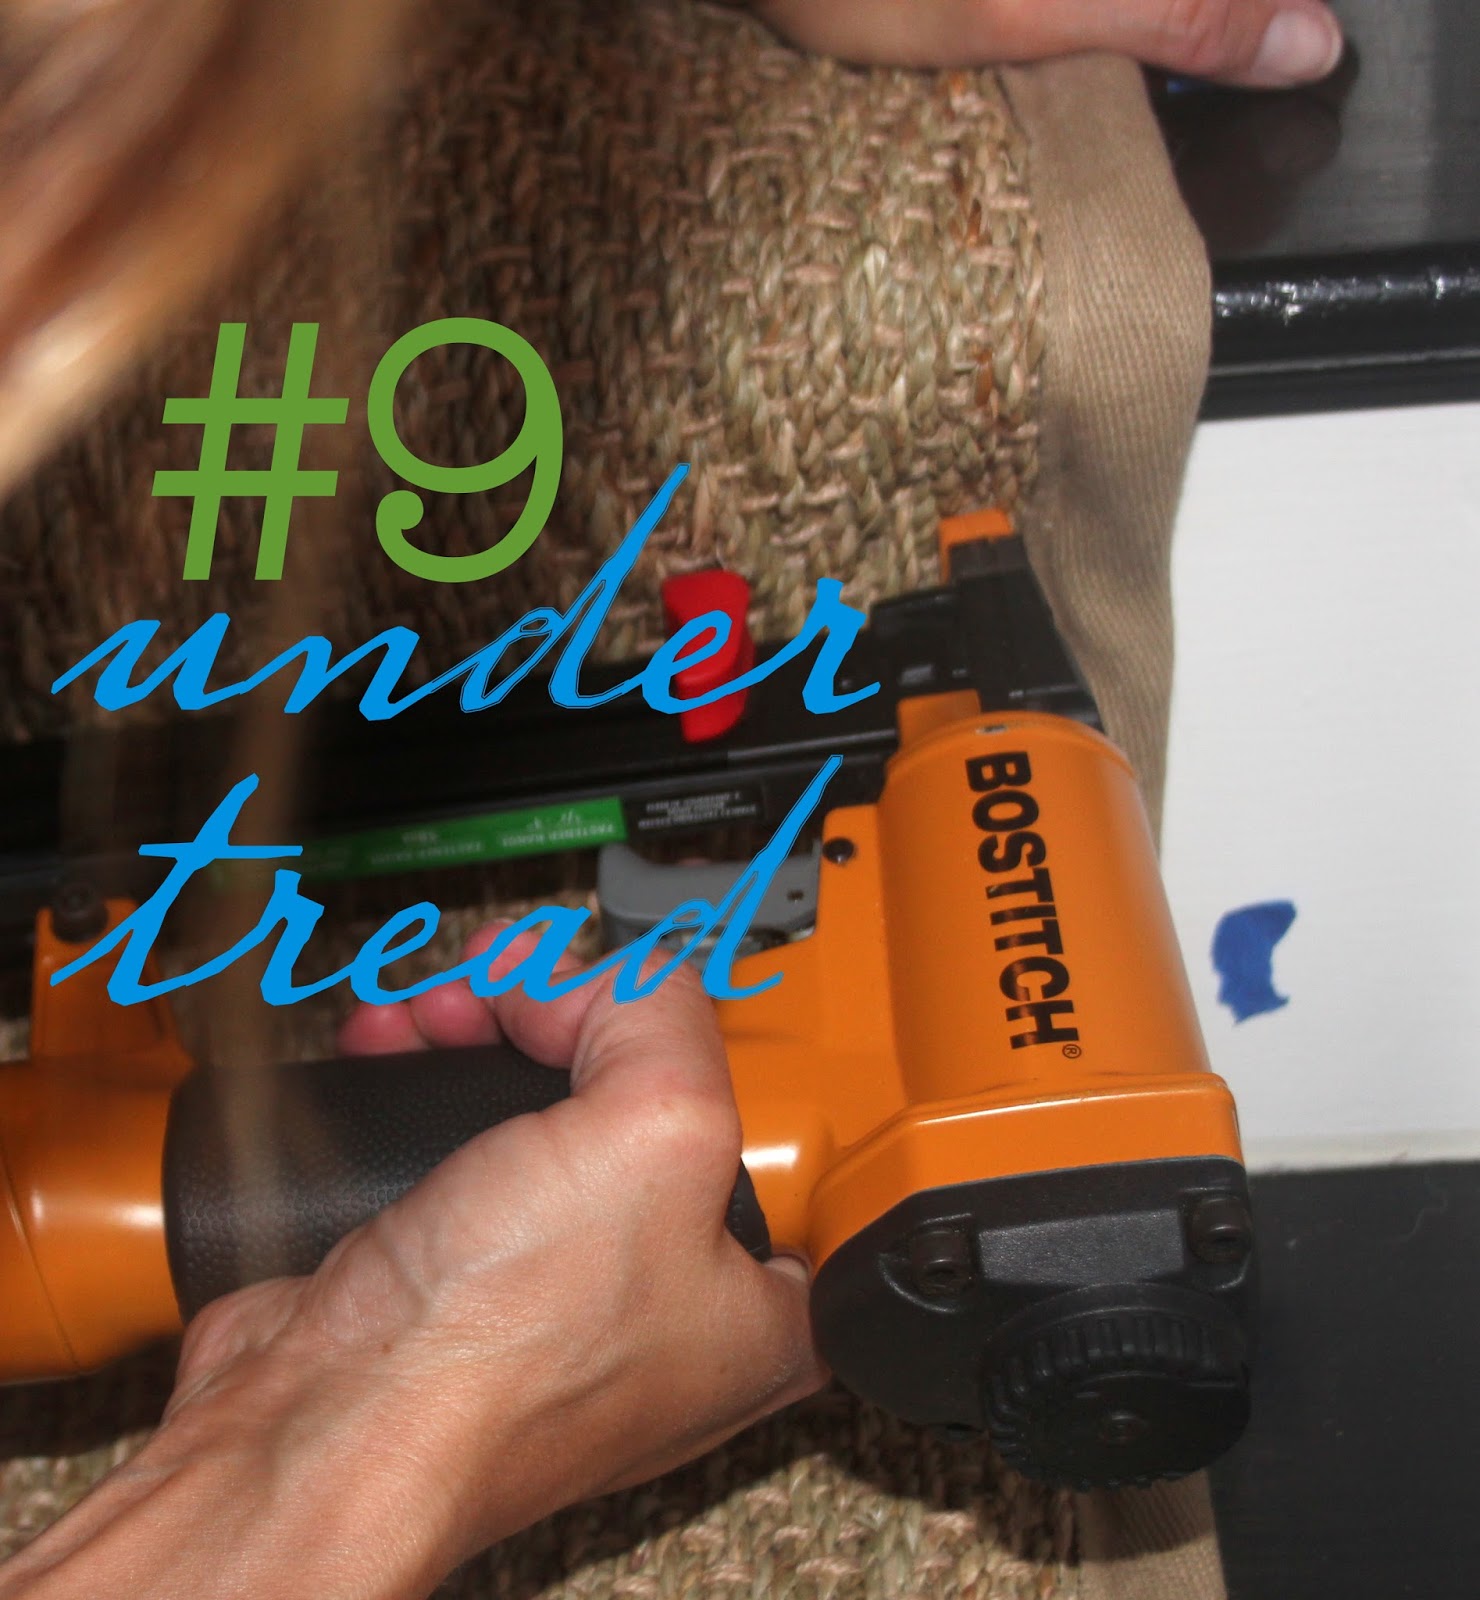
Important!!!

Why? Because stapling the runner under the tread after it has been secured to the step above means that you can make the runner very tight fitting. I chose this tailored look because I was concerned about excess runner causing slips, but you can also go with a “waterfall” installation – examples at end of post.

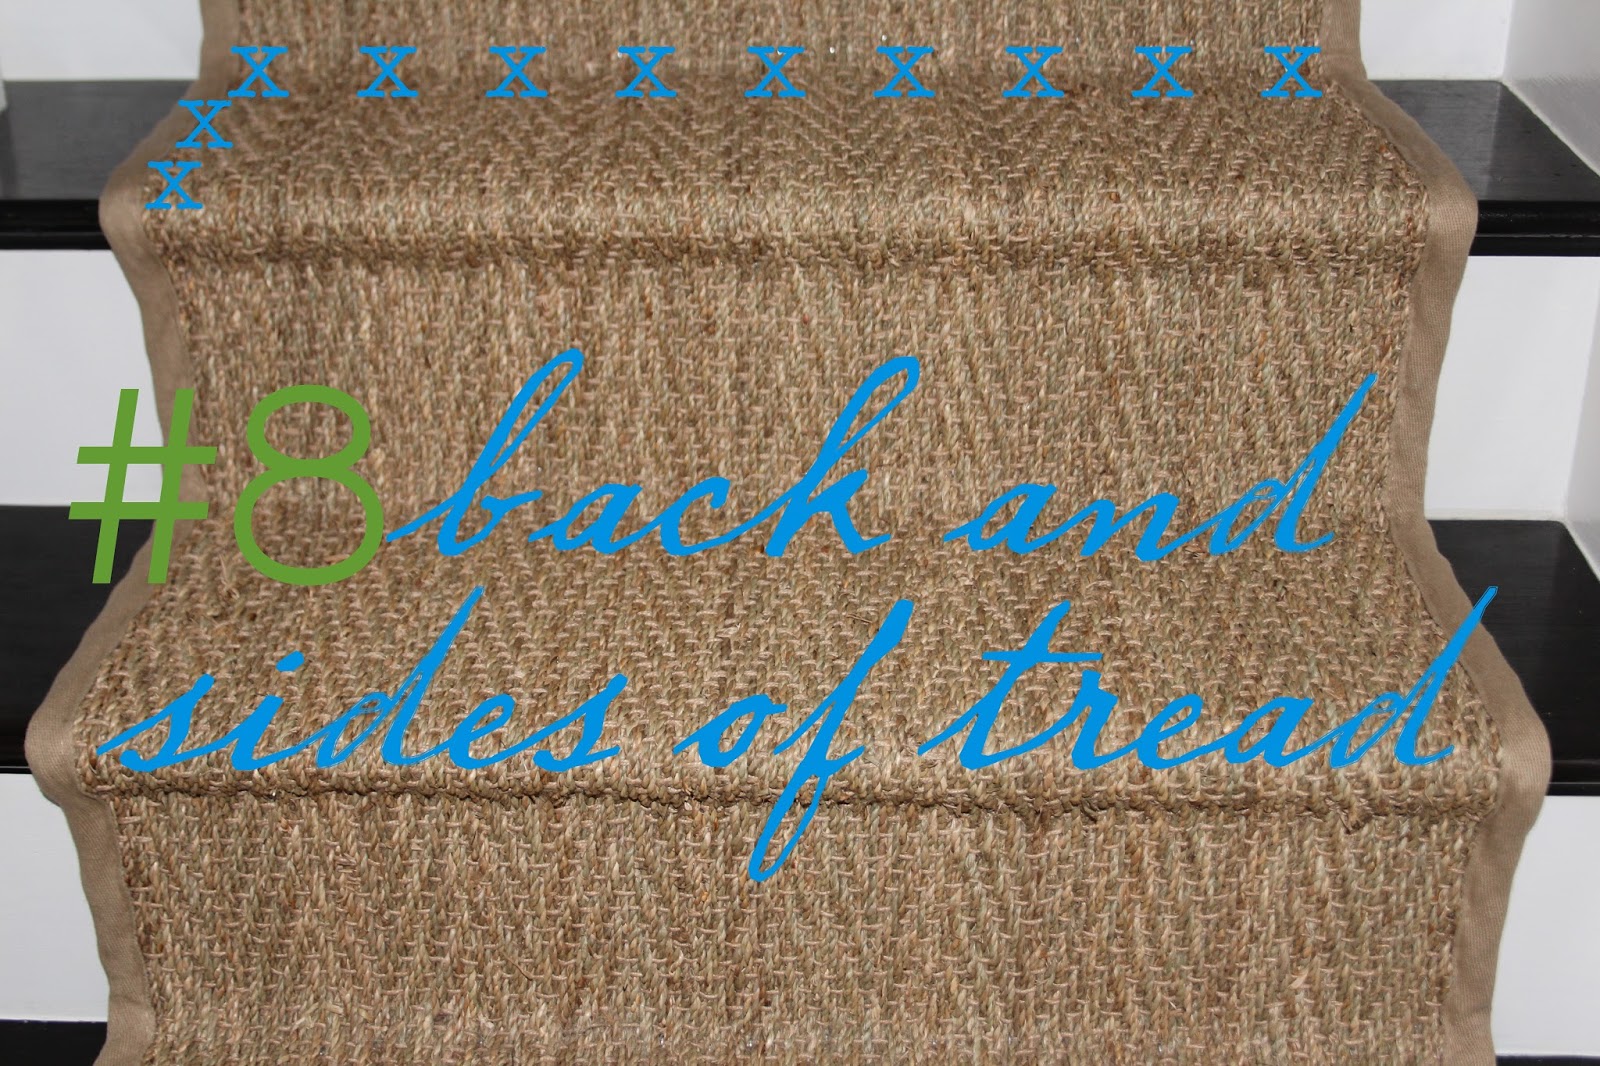
STAPLE TOP OF TREADS


STAPLE BACK OF TREADS
(This blurry photo above shows the underside of the tread already stapled, ignore that. I learned as I went!) Staying on the same side, pull the runner as tightly as you can across the tread and staple it on the back of the tread, as close to the next riser as possible. Continue across the back of the tread, pushing the runner as tautly as possible toward the riser.
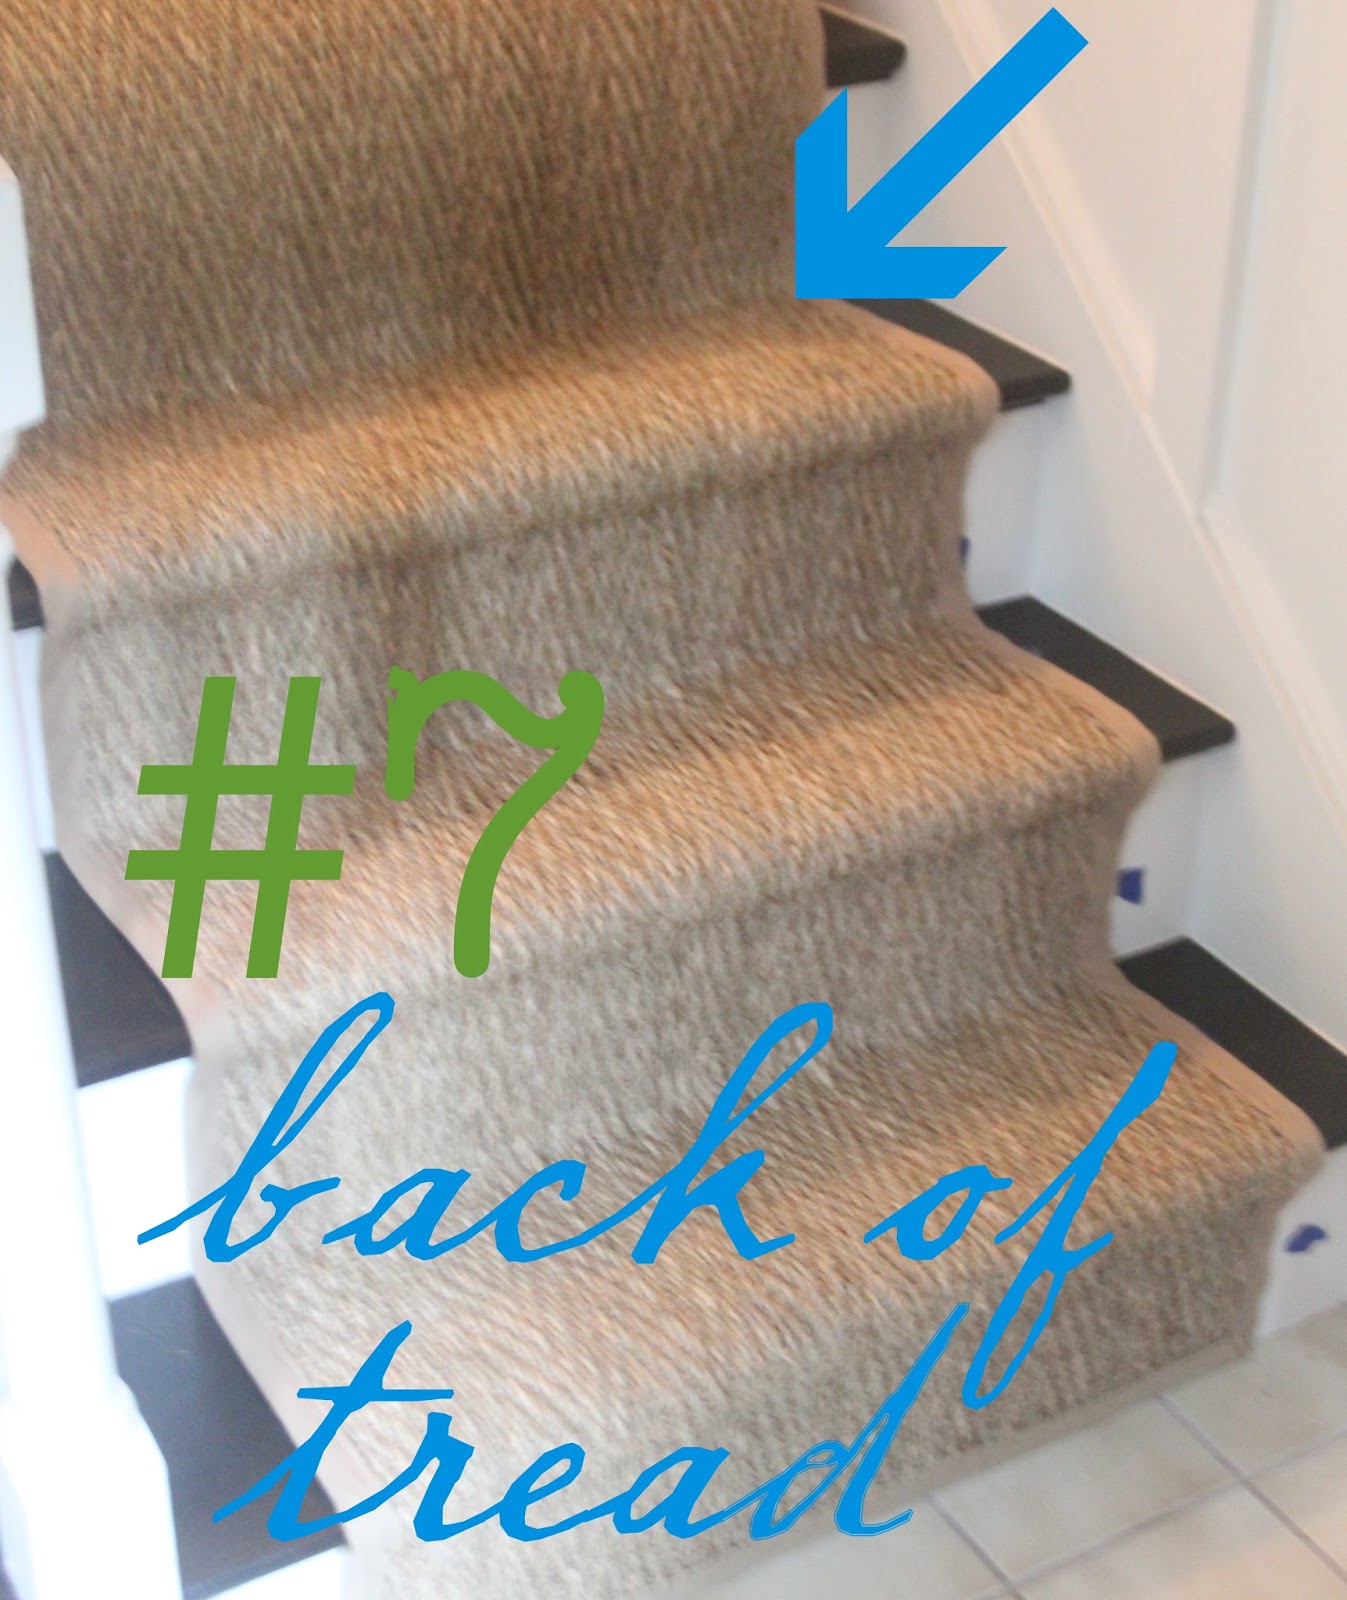
I actually used the tip of the nailer to pull the runner tightly before stapling. You can also use this tool to make each corner as tight as possible (found at most home improvement stores).


MARK & CUT RUNNER


To add trim, I cut it to size and painted it to match the tread above (the tread is stained a very dark brown, but reads black, so I just painted the trim black*).
Then I HOT GLUED the trim right over the very top of the seagrass runner. I also took the time to caulk between the trim and the tread and give this piece a finish coat of black paint (oil based for durability). The trim is not even detectable – you’d only know it was there if you looked at it very closely, or took a picture with a flash :). It just looks like part of the tread, and I love that it finishes off the look of the runner.
*If you are adding trim to cover your cut line, I recommend something very narrow and lightweight. You can paint or stain it to match the tread above, or you can stain it the same color as the seagrass runner if you want to blend it in even more.
That’s it! You’re done!! Piece of cake right???!!


SOME THINGS TO CONSIDER
STYLE OF INSTALLATION. You can opt for the “waterfall” style (on the left), or the more tailored look (right) in which the runner is stapled under the tread. I chose the tailored look on the right, because the runner on the first few steps I installed felt a little looser than I wanted.
You can also achieve a nice tight fitting where the tread meets the riser by using the tool I mentioned above.

BINDING OR NO BINDING? I went with a binding because the seagrass herringbone runner I liked came at a good price with the binding. It wasn’t a deal breaker for me – I could have done without. I bought one long runner and cut it into 2 parts for my lower and upper stairs, which meant that one part of the stairs has the binding and the other doesn’t. I chose to put the binding on the bottom of my steps, with the cut part at the top. I don’t think there is a right or wrong here.

SLIPPERY? Several people had heard seagrass on stairs was a bad idea because supposedly it would be more slippery than a regular runner. I actually think the opposite is true. In my last two houses we had wool carpet runners and over the years the kids and I slipped on them, and years ago my husband slipped down a bare set of wood stairs and broke a toe (the day before he had to be in a wedding!) The seagrass runner has texture and I have not found it to be slippery at all in the month that we’ve had it installed.
COMFORTABLE? Seagrass is definitely NOT as soft and comfy as a regular carpet. However, we’ve had natural fiber rugs in our homes for years and we don’t mind the texture, even on bare feet.
DURABLE? No doubt about it, seagrass is great for not showing wear. With the 9×12 area rug we owned for over a decade, the only stain I wasn’t able to overcome was dog pee, which also left a smell that could not be eradicated. We used that rug in our dining room and then our living room and it saw a LOT of traffic over the years, and held up wonderfully. Since our dog doesn’t go up stairs, I wanted something that would stand up to the heavy traffic this family of 5 gives the stairs. Durability is the #1 reason I chose it for our stairs (okay, #2. I really just love the look!)
I think it’s important to note that my installation is not perfect. This was my first stair runner installation and I learned as I went. The upper portion of my stairs, after the landing, is off-centered even after I measured 700 times, because I got cocky and didn’t use tape as a guide (see the #12 photo). You can’t see that part from the foyer, so I’m okay with it.
All in all, I think it all came out pretty good, and I am my own worst critic. I am glad I tried it – and I am especially glad at the money I saved by doing it myself!!


Cassie @ Primitive & Proper says
how about you come do my playroom stairs and i can paint some stuff for you, k?
Nantucket Daffodil says
Lisa, I am quite impressed! I love seagrass (as you know), and would love to see this on our stairs! Our stairs are painted wood. After my surgery in January I was carrying down some dirty bedding and I slipped on the edge of a blanket. I kerplunked all the way down. I turned sideways quickly, afraid to do damage to my recent surgical site. So truly any kind of stairs have potential! Great job!
Elizabeth BlueClearSky says
It looks wonderful, Lisa. What a transformation from the before. If we ever get around to this project I will use your tutorial so I pinned it just in case.
Calypso In The Country says
Lisa, I am SO impressed! It looks beautiful! That staircase/foyer has really gone through a transformation! I love seagrass so much but I wonder how it would handle all of our golden retriever fur?…
-Shelley
Jennifer @ Dimples and Tangles says
Your foyer is just so beautiful, Lisa! I can't believe how far it's come with all of your hard work. I think I need a pneumatic staple gun. 🙂
sarah @makingitmyhome.blogspot.com says
ahh, i wish i knew this before we put in new carpet on the stairs when we bought the house. after a only a few months, it is looking dingy and dirty. this would have looked so much better
Vel Criste says
Piece of cake for you Lisa! hahaha! I don't think I could do this without a lot of mistakes, even with your great tutorial! I'm just horrible at centering things. I actually never realized the importance of that part -see?! Where did you order your carpet in the first place? I don't think you mentioned that, is it expensive? Just curious, I want to add a super long runner in my hallway. Anyway, love it dear, so professionally done I think! enjoy the fruit of your labor! 🙂
Kelly @ View Along the Way says
I always wondered how you do this! It is GORGEOUS!
NanaDiana says
Wow,Lisa- That looks really great. You did a tremendous job on there and what a wonderful tutorial. xo Diana
pam {simple details} says
Oh my gosh, Lisa!! It is gorgeous, your classic, coastal, rustic look is coming together, so exciting! I remember that style collage you posted sometime last year with the black and white ~ you've nailed it! 🙂 I'm always so impressed with your detailed tutorials, too!
Mary Ann at classic•casual•home says
Excellent…I have had seagrass on stairs in previous homes and in clients' homes and LOVED it. I think it may be what I should do in my current home…or stripes. I'm on the fence. THANK YOU!!
stephanie says
This is truly amazing. –ok. mind blown. Looks great –congrats!
Katie says
great job!
Kris @ Driven by Décor says
Thanks so much for taking the time to write such a detailed how-to. I've got a lot of other things prioritized above it, but eventually I AM going to to do this and have pinned it so I'll know where to find all your great advice when I do!
Jennifer Schmitz says
You have totally changed your entry way. I love it and your seagrass stair runner looks great. Its gorgeous!
Jennifer @ Decorated Chaos
http://decoratedchaos.blogspot.com
Shelley | Crazy Wonderful says
Holy cow, I am ubber impressed!!! The runner looks insanely awesome! I've always wanted stairs with a seagrass runner.
Deidre says
This just makes it all POP! Love this look and the runner,just lovely:)
Bethany [at] Powell Brower Home says
lisa – this is incredible. your foyer looks so fresh now!!! wow,great tutorial too. i always wondered how this would work
Ellora Drinnen says
Your stairway and entry is so pretty! You did a great job with the runner and I love the seagrass!
Dear Lillie says
This looks AMAZING! What a transformation!
gg says
im going to give this a shot!!! thanks for the tutorial
Tiffany @ {Living Savvy} says
I love this idea! Sisal is a great product to pick for heavy traffic areas like stairs! I love the natural texture with the black and white also!
Jane says
I love this so much i'm going to pin it!! Our stairs need refinishing and the hubby doesn't want to spend the money. This is a great alternative. We could paint the stair risers and banister. And then do the sisal runner. Thanks so much for sharing, it looks Awesome!!
And thanks for linking up to Frugalicious Friday too!
Jane
FF
jelly andrews says
I love the result. It looks so great. It just gives your stair an elegant look. And I guess it is something that would surely start a conversation with your guests.
Shannon Smith says
Ok…I installed a seagrass runner using your instructions. Turned out great. Your instructions were perfect. Thanks so much for sharing!!
Tery H says
I am about to put a runner on my stairs. I can't decide between a cotton striped rug or seagrass…leaning towards the seagrass since finding your blog. How has it held up with kids and dogs? You are almost a year into it…is it holding up?
Thanks!! Your tutorial will help me so much!
Kim Gibson says
I'm wondering the same thing as Tery. We are planning on putting a stair runner on our stairs. It looks beautiful in your home, but how has it held up???
Erin Burke says
Thanks for the tutorial, Lisa! it looks awesome. I'm working on options now for our stair runner and leaning towards seagrass. Can you tell me where you got the runner from….the link doesn't seem to work. Thank you!
[email protected] says
Hi everyone, I have had a lot of inquiries about this post and how the runner has held up. I've tried to get back to everyone personally but if you don't have an email address linked to your commenting profile then I have no way of getting back to you (if that's the case, add your email so you can get replies on comments!) I will write a follow up post in near future but a couple things —
–our runner has held up great to traffic! Looks just as good today as it did when installed a year ago.
–I purchased our runner from Overstock, it was the best deal I found on the herringbone pattern for the length I needed. There are lots of good deals on natural fiber rugs online. The one I bought is Safavieh and I'm really happy with quality.
–let me know if you have any other questions and leave your email address if you don't have one on your commenting profile!
Thanks for your interest and visit to Shine Your Light! Lisa
Daniele says
Hi there, this is very useful thanks for sharing!
One question on the stapler. You say that you used a stapler with a 3/4 crown, but the link you have is to a 1/4 crown stapler. Could you clarify which one you used? I would like to install a jute runner and I am concerned that the 1/4 crown may go through the weave, but the 3/4 looks very wide.
thx
daniele
Lisa says
Hi Danielle, so sorry about that, I must have linked to the wrong one! I definitely used 3/4 staples. I don’t think the 1/4″ would sink very deeply into the treads and risers!
Daniele says
Laura,
thanks for your reply!
Do you mean to say the crown (top width of the staple) or the depth of the staple? I have a jute runner, which is 3/4″ thick so I was definitely thinking of using 1 or 1-1/4 depth, but was unsure on the size of crown and if the 1.4 would be wide enough.
Thanks!!
daniele
Lisa says
Hmmm I’m not sure on the exact size Danielle. I loaned my pneumatic air gun to someone so I can’t check the staples I used. The top width of the staples are about 1/4″ I think but they are well hidden so I am not 100% sure! Sorry about that, hope you find one that works!
Daniele says
Thanks!
Anne says
Hi,
Just wondering why you started at the bottom vs the top?
Thanks!
Lisa says
Hi Anne, I started at the bottom because that’s the part that is visible from my foyer and I wanted to use the binded end of the runner at the bottom of the stairs. I suppose you could go either way if you don’t use a binded runner!
Molliemae west says
Lisa- Great idea.
I’m looking to do something similar however have been struggling to find a sea grass runner and the separate grip runner.
Do you have any recommendations as to where I could purchase one from?
Lisa says
Sure! There are links to the exact products I used in the post. The gripper can be found here: https://rstyle.me/+ceQ9r1u4BbyfWxUJpL6R-Q and the sea grass runner I used is this one: https://rstyle.me/+83-zkgyRDfumqqvSCggUxg – best wishes with your stair project!
Beth says
Is there a reason you didn’t put the runner on the landing? I have stairs that turn with a few diagonal steps, I’m wondering how hard it will be to match up.