
However, the problem we have always had with this fabric ottoman is that there is no place to put a plate of food or a drink – a big issue when we entertain. I have used a couple of small trays and even a framed mirror:

but with three kids I worried about this option – they are not exactly gentle, my cherubs. So the mirror went onto a wall, where the darlings are less likely to shatter it, and I was back to my ottoman issue.
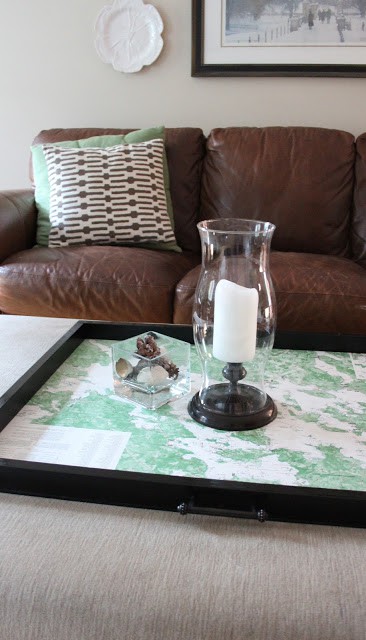
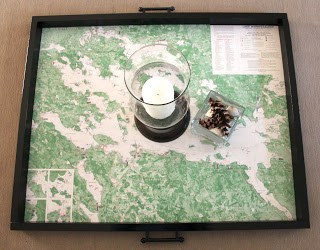
I simply could NOT find a tray that was big enough and within my budget. So what’s a girl to do but build her own tray? When I recently “inherited” some nautical charts from my parents-in-law, I realized one of them would be perfect in size and color for my tray project! The end result is super functional as well as bringing a little personality to our family room.
This is a really easy project for a newbie carpenter, just a few cuts and joins!
HOW I BUILT THIS MAP TRAY
1 | I bought a piece of 1/4″ oak plywood – oak because it seemed to be the most non-warped of the plywoods, but birch is another great option because it’s smooth. I had the plywood sheet cut down to a smidgen bigger than the map in the store.
2 | Then I sanded the edges and Mod Podged the map onto the the plywood. I also coated the top of the map with Mod Podge so the surface of the tray would be protected from spills.


It’s not huge, but big enough for some refreshments, plus it makes the ottoman look less like a twin bed in the middle of our family room, and more like an actual coffee table.


pam {simple details} says
I knew you'd have a cool diy, and I love that huge ottoman! You have to pin it on the 'obsessed with maps' Pinterest board, there were a lot of projects and not one like this, you creative girl! Your chairs are perfect in there, too!
Kathy C. says
So quick and easy! I love it!
Cassie @ Primitive & Proper says
it looks fabulous and i love the punch of color it adds!
Kelly @ View Along the Way says
Lisa! It looks so expensive and not DIY at ALL. TOTALLY fabulous!!
Finding Home says
Such a clever project – so pretty in the room and thanks for the tip about turning the can upside down! Thanks for sharing at our link party. Take care, Laura
My Crafty Home Life says
i would love to come over and join you. Red wine is my favorite. You did an awesome job, and solved this so creatively. Enjoy the fire.
Cathy Wall says
Love the nautical map and the color/pattern it brings into the room. What a perfect DIY and great use of a gift.
Dana Frieling says
I love it! I really love the green map. So unique! This is one of the things I appreciate about you…can't find it? Oh well, I'll just make it. You're awesome like that!
Nancy says
I love what you did with the ottoman tray, it is perfect! Great job. A perfect place for a map… hope your little man doesn't mind losing his nap spot!
xo Nancy
Powellbrowerhome.com
Linda @ it all started with paint says
Single. Best. Spray. Paint. Tip. Ever.
Oh, and love the tray too!
Thanks so much for sharing at our spray paint link party!
🙂
Linda
Jennifer @ Dimples and Tangles says
You are brilliant! I think if you could have or would have spent a chunk of change on a tray, it wouldn't have been better than this one! How satisfying to know you made it yourself, and it's such a personal, functional and interesting accessory!
Urban Orchard Interiors says
So clever! I love a good map project.
-Lane